Wednesday, May 29, 2013

Drying wood indoors


I had bought a lot of wood for building a bunk bed. One of the problems I faced was that the wood was really wet, even wet to the touch. It was straight out of the tree. With temperatures reaching 45 degrees centigrade in Vellore, drying the wood outside, though tempting resulted in cracks. So this wood was dried indoors, before planing. This is karuvelum wood or the Indian Babul. I stacked up the wood indoors and put on the fan. It dried a lot over a week. The pile of wood on the left is the wood stacked for drying. The previous lot of wood, already dried is seen piled up on the right.

This is by no means the correct way to dry wood. Wood is supposed to dry slowly, over a period of months to a year, with the humidity controlled. But this was my only option. 

Karuvelum (Babul) wood stacked indoors for drying. To the right is seen wood already dried, piled up close together.

Wednesday, May 15, 2013

Cracks in wood

 One of the problems that I have been facing is the many cracks that develop in wood as it dries. I have been planning to use karuvelam wood (babul) for making a bunk bed. Drying it outside caused cracks at the end. From what I have read this seems to be due to drying too fast. (Vellore now has temperatures above 40 degrees Centigrade). I plan to dry it indoors so that the process is a little slower and see if this helps.
Cracks in wood
Cracks that developed in Babul wood on drying rapidly (karuvelam wood)

(This is my first post using windows live writer)

Monday, April 15, 2013

MDF toy box

With two kids at home, there are always toys strewn around. We wanted some way to rapidly store them. There are commercially available stacking boxes that are very convenient, but then as I always claim to be able to make the same, I decided to go ahead and do so.
This was my first foray with MDF.

The first impressions : MDF is really heavy. It is heavier than plywood of the same thickness. It is dense, and tends to chip at the edges if you bump it around. But it is straight and smooth.

Wooden toy storage box made from MDF and varnished over.

Wooden toy box : The unending joy that a box can provide to a child...


Wood : 10 mm  MDF, with varnish over it,

Dimensions : About 2.5 ft x 1 ft x 1 ft.

Hinges : Fixed them initially, but as I could not get safety hinges, and the kids seemed to enjoy slamming it shut, I finally removed the hinges and made the top removable.

Wheels : I had also attached small castor wheels underneath. However this was very tempting for the kids and they started pushing it here and there and bumping their feet. So off went the wheels and instead I used nylon bushes. As he floor is very smooth, it slides easily.

Final impressions : Stores a lot of toys. However it is very heavy, and the kids cannot easily open and close it. It therefore stores all the toys that they are not really using. It can be pushed under the sofa as well as as a small step for my daughter to reach the sink.

If I were to do it again, I would use 'commercial ply' and paint it over. It was just much easier to work with, and I think would be lighter. I would also make the whole box smaller. I still have to fix handles for the box, but have not got down to doing so as yet.


Sunday, April 14, 2013

Skil 0909 Portable Worbench

With a space crunch I decided to go ahead and purchase a skil workbench. This was available from Mach power tools

Service : Excellent service from Mach power tools as has been my experience.

Packaging : Very slim parcel, nicely packed

Skil 0909 workbench was available in India from Mach Power Tools. Slim packaging 

I first dumped out all the components. Needless to say my kids were very excited with the process. Assembly was fairly simple using the provided literature.

Skil 0909 workbench with individual components

The table top waas assembled first, and the supports later.

Skil 0909 workbench assembled table top
The kids had a whale of a time playing with the table.

Assembled skil 0909 workbench.Note the holes in the lower cross bars for holding tools

Final Impressions. This table is a light duty table. It is useful for light work. I use it routinely now to clamp my proxxon DS 230E scroll saw, that obviates the need to screw it down on to the table. The table cannot be completely folded which is kind of a design flaw, but is sturdy enough for light work.  The holes for the tool holders on the lower cross bars are very useful for hanging up tools that one often uses. There are many holes on the table top for the bench dogs. The bench dogs help hold pieces of varied shapes. For Rs 2500/-  I think that the table is really worth it. A pair of these will be more useful than one.

Skil 0909 workbench being used to clam the proxxon DS 230/E scroll saw


Small wooden wall shelf

I had some pieces of finger jointed rubber that I wanted to use as a shelf.  Here is how it went. Dimensions were based on the pieces I had

Wood : Finger jointed wood, 18mm for the base and the cross bar, 12 mm for the sides.

Finish : Sheenlac walnut stain, with an asian paints varnish wiped over it.

The finished product : This was the first time I experimented with dowels for anchoring the sides. This seemed very solid, however I think the quality of my dowels was not very good. I must try making my own dowels.

Secondly a bit of fevicol peeping out of the joint took up stain deeply and appeared as blotches. I have to be a little more careful next time.

Book Shelf : Unstained finger jointed wood. Sides joined with dowels
Empty book shelf stained with Sheenlac walnut stain to match the picture above.  Fixed to the wall with two screws

Wooden book shelf bearing a full weight of books. 

Friday, April 12, 2013

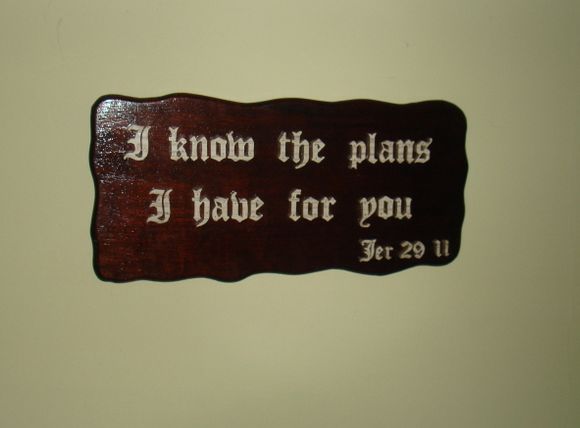
Wooden Plaque 3

This was another plaque that I made as a gift. It is a verse from the Bible.

Wood : Vengail wood. This is a heavy hard wood used for furniture in South India. This is the first time I was using this wood. It is good wood, but the grains are not very pronounced. The grains were close and parallel, and not visible well on staining.

Rounding : Using a router table and a rounding over bit. For my previous plaques I used a bevel cut with a jigsaw. For this I rounded over the sides to see how they looked.

Letters : 6mm plywood with a laminate. This was cut with a proxxon DS 230E scroll saw.

Finish : Asian paints clear varnish after staining with sheenlac rosewood stain.

Fixing the letters. : I pre-drilled thin holes with a dremel (Thanks Anandit!). This made hammering the nails much easier.

Hanging : Used copper wire and hooks for hanging it up. This self centers the pieces and is more rigid that a string or a single keyhole.

Wooden plaque made of Vengai wood : I know the plans I have for you

Sunday, March 3, 2013

Wooden guns

This was a simple wooden gun glued together with scrap pieces of wood. My son had to go for a fancy dress competition, and rather than spend time on a temporary costume, I thought I would make a more durable item.
A gun and a cap competed the costume. He is supposed to be Jim Corbett.
The wooden gun made from scrap plywood.
The costume compete with hat, gun and grin...


 Making it : The pattern was some world war II rifle.
A long thin piece of plywood on the top, with a broader piece below. Fevicol and screws from the top. A brown small drawer handle in the region of the trigger. Two small metal studs were added for the strap, made of black wire. The upper piece painted black. The lower piece just stained with walnut stain.
Wooden gun : The trigger guard made from a small door handle

Wooden gun : In slight misuse 


Saturday, December 22, 2012

Under bed storage : Basic trundle

I suppose most houses in India have the same problem as I do : Too little storage space. A lot of our winter clothes (Vellore actually has no winter) lie in suitcases that are pushed under the bed. Gradually they go deeper and deeper under the bed, until the day I swim deep in the dust and fish the box out, only to find that it does not have the piece I am looking for.
I have the same problem in my make  do workshop where I would like to store items under the bed. (My present work area is our guest room, permission for which my wife has so graciously granted). So after looking at various trundle type storage units on the web, I decided to make a basic one.

There is nothing to it actually. It is an 10 mm MDF board with 6 small wheels screwed underneath. The advantage of this is that the items will not get scratched, and pulling it out is far easier.


The under side of the trundle with six wheels. My son is hiding behind it.

My little daughter trying to push my son off the trundle. It makes a good toy

Under bed storage with at trundle

The trundle with some boxes that will finally roll under the bed
 I plan to use a similar model for my gas cylinder and for my rice storage container some time in the future.


Saturday, December 8, 2012

Wooden castle blocks

This is a set of wooden castle blocks made as a gift.
Wooden castle blocks

The inspiration was the set of wooden blocks from Down To Earth available here

Wood : Actually not sure. This was called "country wood" by the lumber people. An inexpensive wood. It was initially about 1.5 inches thick, that was smoothed in the lumber mill to about 1 inch thick.

Design : I made the gate, two towers and four wall pieces, drawn freehand. I made one entrance piece, two towers and four wall pieces. The towers and entrances required added supports to prevent them from toppling over easily.
Wooden castle blocks : The entrance with a door. Required Supports

Wooden castle blocks : The wall pieces 
Wooden castle blocks : Tower pieces : They required supports
Cutting : With a Skil Jigsaw.

Smoothing : Rounded over the edges with a rounding over bit on my router table.

Windows : Drilled a hole with a 9 mm bit and used a jigsaw to cut it out.

Supports. I rounded over a cuboid of the same wood and sliced off a small bit using the table saw. The two are supported with a screw inside, the head of the screw is covered with a plug of the same material.

Sanding : Very little needed on the surface. There were burn marks that hand to be sanded off for which I used a flexishaft with a sanding attachment.

Finish : Clear varnish wiped immediately after applying. There must be a better way to do this but I am learning this. If the finish comes off I will have to re apply this.

 Finished product: This can be rearranged to make a circle or a wall of castle.

Wooden castle blocks


Wooden Toy Sword

This is a toy sword made for kids in the age group 5 years or so.

Wooden sword from finger jointed rubber
Wood : finger jointed rubber, 18 mm thick. I had a long waste piece that determined the total length.

Cutting : Using a skil jigsaw. The corners were rounded over using a rounding over bit on my router table.

Finish: Well I do not know how long this will last but i used virgin olive oil and rubbed off the extra. I will post updates on how this fares. I wanted everything to be natural.

Final Product : I probably should have made a pair. This is a very basic sword with no detail, but I suspect that in a kids eyes, a long stick, this sword and the most elaborately detailed one are equal. Kids.. the great levelers...

My son Arpit with the wooden sword