I have toyed with the idea of building a wooden wagon. However while I was reasonably certain of the structure of the wagon, the steering mechanism and fixing the wheels was a deterrent. However this May day I decided to take the plunge and go ahead with the wagon.
The Base
 I used 3x2 feet of half inch plywood for the base. There is nothing special about the dimensions. The wagon can be made smaller and lighter if one wants. I used this as I had a large plywood piece lying with me and I wanted a wagon to seat two four year olds. There is no supporting bar underneath for the plywood as yet. If this tends to sag with weight I will have to build some supporting cross bars later.
The sides
 I went to the wood shop (Om Timbers) and asked them for the cheapest wood they had. They asked me for my use and when I described my plan, they suggested I go in for second degree teak wood. This was available for Rs 1800 per sathram (or cubic foot) I purchased four 2x1 inch reapers, each 6 feet long. This cost about Rs 700. I got them planed in a nearby shop. Three horizontal bars for the back with vertical bars to support them. The lowest horizontal bar is fixed from the under side of the base. At each joint, I used two one and a half inch screws. Using one screw will allow the whole joint to shift sideways. Therefore I used two.
 For the front I used two horizontal bars with vertical bars to support. For the sides it was a continuation of the front and the back. I decided to leave a gap between the front and the back, something for the kids to get on and off. I also made each level smaller than the other to give it a stepped look. This was both for the design and also because I was running short of wood and did not want to make the trip to the timber market again.
The wheels
 Ah the wheels! I scourged the internet for wheels. All wagons made abroad seem to have fantastic wheels with good axles and bearings. They look rugged. However although there are websites for such wheels in India, they are wholesale. I have yet to find a good online or offline shop that provides good wheels. Automatic wheelchair wheels are an option, but I am sure they will be sold at a premium. I finally went in for tricycle wheels. These were available for Rs 60 per wheel. This is a plastic tricycle back wheel. (The front wheel and back wheel are different in a tricycle as the front wheel has a square shaped depression for pedaling and is not so robust for free movement)
The axles
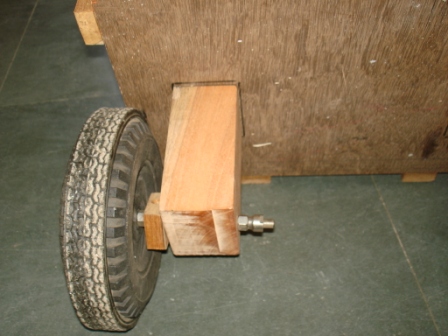
 I used normal cycle axles for the wheels. These are available for Rs 20 a pair. I used four for the four wheels and two for the steering mechanism for the front wheels. Although I initially mounted them on small blocks of wood, it was shaky and bent with the weight. I decided to go in for a solid piece of lumber. This time I went to a different lumber mill and purchased 4x4 inch beam of Veppam wood (Neem) This was available for Rs 900 per cubic foot. I cut off the required height and drilled through it at its lower end. I mounted the axle with the wheel. Four screws from the top of the base fixed the wooden block in place. Small blocks of wood drilled through serve as thick washers. This wheel assembly is not perfectly aligned. There is a slight wobble anyway, but it moves freely and supports weight.
Steering mechanism
Mounting the front wheels required the wheels to turn left and right in addition to rotating. Some sort of steering mechanism was needed. I modeled my steering on the picture given at this link at the welders forum. I used one inch strips of plywood for the steering beams.
 The steering mechainsm was as shown in the picture alongside. The front wheels were mounted on smaller 4x4 blocks. In addition to the hole for the axle of the wheel, another hole was drilled vertically. Through this a cycle axle was inserted. The whole assembly was not fixed directly to the base, but indirectly on a small platform. This enabled the vertical axle to turn left and right. The central beam had a hole to pivot the steering bar. From each 4x4 block small strips of plywood projected forwards and these were articulated with a connecting cross beam that was also pivoted on the steering bar.
 A metal rod was fixed on the front end of the steering bar. The nuts and bolts were not fixed tight so as to enable movement. When one turns left or right with the bar, each wheel pivots on its vertical axis to the left or to the right. This is a more complicated way of making the steering mechanism. A simple cross bar and central pivot would suffice. But the wheels would change position on turning and this could make the wagon unstable. Now the wheels do not change position but just turn where they are.
The finished product
 The wagon is functional now. My kids enjoy being pulled on the wagon. It can seat two comfortably and three to four with a squeeze. However when two kids sit on the weight increases by 30 kilos and it is an effort to pull them. Pulling toys and one kid is a breeze though.
Some things need some changes though. I plan to gradually change all screws to stainless steel screws. The wheels wobble a little. This needs to be addressed and I plan to fix some wooden wheel caps for decoration and stability. Right now we use a rope as a handle. I plan to make a wooden handle later on. Perhaps stain and polish the wood too. However I think none of these matter to the kids. They seem to love it the way it is so any major work will only be when something breaks down.
The Base

The sides


The wheels

The axles
Steering mechanism
Mounting the front wheels required the wheels to turn left and right in addition to rotating. Some sort of steering mechanism was needed. I modeled my steering on the picture given at this link at the welders forum. I used one inch strips of plywood for the steering beams.


The finished product

Some things need some changes though. I plan to gradually change all screws to stainless steel screws. The wheels wobble a little. This needs to be addressed and I plan to fix some wooden wheel caps for decoration and stability. Right now we use a rope as a handle. I plan to make a wooden handle later on. Perhaps stain and polish the wood too. However I think none of these matter to the kids. They seem to love it the way it is so any major work will only be when something breaks down.
Wow mighty impressive Vinay ! Just amazes me as to what all you can build around the house... This is really a excellent project and you seem to have done a really great job ! I shall look at these pictures in detail and shall come back to you with queries... I know am gonna have lots !
ReplyDeletethanks somu
ReplyDeleteAmazing! You are one hell of an engineer. And you make your kids happy too. You should be making jigs and stuff like that. Best wishes.
ReplyDeleteThanks Indranil.
ReplyDeleteWatching you work is like watching the evolution of culture.. we have reached wheel and wagon level now..Waiting eagerly for the next construct
ReplyDeleteHai Vinay, introduce I'm Bayu, From Indonesia.
ReplyDeleteI'm interesting with your wagon desain,, i would made wagon for my children too.
can i get your contact, maybe email or whatsapp number. i will ask some question about your wagon.
This is my contact number and email
email : ardanabay@gmail.com
I will glad dot advice from you.
Best Regard
Bayu
your work is good ..!! if you made with canopy it looks Awesome ...!!
ReplyDelete"_Parabéns!"
ReplyDelete"_Parabéns!"
ReplyDeleteWhile pinned blades have some advantages, they have one very big disadvantage: You can't cut any small inside detail cuts since you have to drill a very big hole to get the blade's pin through. best pole saws
ReplyDelete