Saturday, September 6, 2014

Crayon holder


A crayon holder to hold 24 thick crayons.

Crayon holder
Wood: Babul (karuvelam)
Finish: Asian paints PU exterior Sealant, followed by PU exterior Glossy.
Making it: the bottom of the boat was cut out of a 2x4 reaper of karuvelam wood using a jigsaw. I used a chamfer bit to get the slope of the boat.  A similar process was used for the top of the boat.
The holes are drilled at an incline so that all the crayons point the same way. This was done by tilting the drill press support table.
crayon holder plan
I made a small plan of this using powerpoint to aid the drilling process.


Thursday, September 4, 2014

Wooden Plaque : Love never fails

This is another wooden plaque with the verse "love never fails"


Base: Padauk wood
Letters : Thin neem wood strips cut out with a scroll saw
Finish: Asian paints exterior PU sealer followe by Asian paints exterior Glossy varnish. 


Saturday, July 12, 2014

Styrofoam box table

This was another small thing that I made for my son before I began woodworking. It is a small  table that was made by cutting out the sides of a thermocol (styrofoam box)
Table made from a styrofoam box
It was fun while it lasted. 
However it was too light and my son could toss it around and hammer things into it. Surprisingly it could take his weight. 
The chair was a flat piece of thermocol with some old spice bottles used as the legs. 

Cardboard Carton House

This was a house I made for my son way before I started woodworking. It is a TV carton covered with color paper. I used a black marker to highlight the edges.

Cardboard carton house

House made from an old cardboard carton

Cardboard carton house. 
My son loved it. It is now difficult to get rid of large cartons as they have to be converted into houses. for my later houses I did not have the patience to cover it with color paper.
This did last for a few months.

Wednesday, June 11, 2014

Basic techniques : jigsaw guide

A jigsaw is very useful for cutting free curves.  However for straight cuts  a guide is very useful.

What can you use as a guide?
A piece of wood (factory cut edge).
A piece of aluminium profile. (Note for long pieces there may be slight curves) the heavier the piece the less it may bend.
A commercially available straight edge. ( I have not found any in India. If anyone knows of them please do add your comments)

Make sure that the  straightness of the guide is checked against something reliable. Walls of a house are usually not perfectly straight. Metal rulers usually are straight along the marked edge. A good straight edge reference is a three foot long metal ruler. It is not useful to use as a guide but can be used reasonably well to check straightness of the guide you are going to use.

Jigsaw guide : A piece of molding. Crude, but serves the purpose. 
Straight cuts are best made with a circular saw (with guide) or with a table saw.

Sunday, June 8, 2014

Wooden plaques from babul wood

Here are another set of wooden plaques that I made.
The base is made fro karuvelum wood, bevel cut with a jigsaw.
The lettering from thin pieces of teak wood, cut with a scroll saw.
Small headless nails hold the letters  in addition to glue. The heads of the headless nails have been cut off with a rotary tool.
Finish: Asian Paints PU interior glossy.


Wooden plaques made from karuvelum (babul) wood base and teak wood lettering

Saturday, June 7, 2014

The workshop : A family affair

One of the things I enjoy a lot is when the others in the family join me in the workshop. Fortunately for me my children have not been in the habit of taking my tools and screws and other potentially dangerous tools. But for that matter even a sharpened pencil can be extremely dangerous in the hands of a child.
Nina here insisted on vacuuming the workshop. It has been a marathon few days sorting out junk and trying to bring some order into the spare room that I dare to call my workshop.
Somehow I get reminded of Tom Sawyer whitewashing a fence. I suppose whatever the task, if you enjoy (or pretend to enjoy) doing it, it can really be interesting.

Nina vacuuming the workshop


Monday, May 26, 2014

Magnetic knife holder

This is a magnetic knife holder made from karuvelam (babul) wood. The edges are rounded over using a router.
Knife holder from babul wood using neodymium magnets. Two 5 mm magnets used for each knife. 
I used two 5 mm neodymium magnets for each knife. I drilled a sligthly smaller hole and then tightly pressed the magnet in using a C-clamp. This ensured a tight fit. I used a bit of fevicol just to be on the safe side.

Impressions
The knives stay on. However not all knives are magnetic. Really heavy knives do not stay. I did not add much finish to it. Now that this holder is used a lot, I have noticed some black staining on the wood from the magnets. This is most likely due to hanging up wet knives on the holder.

On retrospect A larger magnet could have been used with a thin piece of wood protecting it. It is a bit scary having all your knives hanging there, and I plan to build a normal knife holder later on. 

Scroll saw wooden fruit

This is a bowl of wooden fruit (well and other foodstuff as well)
The fruits were cut out of 12 mm thick finger jointed rubber wood using a scroll saw. The lines were added using a soldering iron.
Finish is Asian Paints Touch wood applied and immediately wiped off to give a dull, thin finish. This is not very quick finish. 


A bowl of wooden fruit and other foodstuff. 

Wooden fruit and foodstuff. cut out with a scroll saw  (Not to scale )
The fruits are all similar sized, and not to scale. 

Wooden plaque from Padauk wood

This is a plaque made from Padauk wood. The words trigger a lot of family memories.
The base is made from Padauk wood, cut with a jigsaw to at an angle.
The letters are cut out of Neem wood. They are cut with the proxxon DS 230E scroll saw.  They are fixed with small headless nails. Even headless nails cause these small letters to split. To prevent this one has to cut off the heads of the headless nails. A pilot hole also has to be drilled.
I like the natural red color of Padauk wood.
The finish is Asian Paints Polyurethane exterior glossy coating.

Wooden plaque made from Padauk wood and Neem letters

Sunday, May 25, 2014

Scroll saw work

This is a piece made by my friend Sharon Roshan using the Proxxon scroll saw.
She cut out the image from 3mm veneer (I think it is birch).
We stuck it on a background of red Padauk wood, whose sides were rounded over with a router. We used a thin metal chain at the back to hang it up.

Scroll saw design of a grandfather and daughter

Tuesday, March 11, 2014

Simple whiteboard

The need: A small whiteboard for the kitchen to put up a shopping lst

Materials: I already have a white door and a piece of perspex.


Small piece of a perspex sheet 

The white door
Cutting the perspex: With a jigsaw with fine blades. The perspex cracked twice so I had to cut it twice carefully
Cutting the perspex sheet
The finished product : Four holes in the corners with screws fix the plastic sheet on the wall. The finished product serves its purpose though is not really a white board. 
Perspex sheet acting as a small kitchen whiteboard

Garage for toy cars


This is a toy car garage made from bits of plywood.

The base : about 1.5 x1 foot plywood, 12 mm thick. Although I used very good waterproof plywood, in retrospect I think I could have used some cheaper wood. 

Wooden toy garage 

The first floor : Made from teak wood veneer. This turned out to be too thin and needed a pillar to support it.

Beading : made from thin strips of 12 mm plywood. This is to prevent the cars from falling out.

The lift magnet: As this was too big to fix permanently on the structure, I decided to make it removable. A small door magnet was attached to the main structure with the piece of metal on the lift. The lift can then be detached for storage.

Wooden toy garage: Lift is attached with the help of a door magnet

The lift : Both the lift cabin as well as the lift tunnel are made from 6 mm plywood. The entrances to the levels are cut with a scroll saw. To prevent the lift cabin from falling out a small piece of curved teak beading was used. A pulley system on top pulls the lift cabin using a small metal chain. The cars kept rolling off the lift cabin. To prevent this I had to drill many holes at the bottom of the lift cabin to catch the wheels of the car.

Wooden toy garage: Lift 

Painting the lift: As this was plywood, the first coat was white primer. This was followed by different colored enamel paints. Most of the light blue was a matte finish that I really liked. Applying the primer was a family affair.


Wooden toy garage: Applying primer

Wooden toy garage: Applying primer


The final product: The lift has been in use and been painted and modified for over a year now. Though this piece evolved over time and is really not square anywhere, and is made from three different types of plywood, it is quite enjoyed by the kids and is one of the toys they keep playing with over and over again. The house (looks like a kennel) could have been better designed!

Wooden toy garage, in use


Making toys for kids : Lessons I have learnt

One of the joys of being involved in woodworking is that one can make toys for one's kids. One can actually say "Do you want me to make something like that for you?" However after making (and not making) toys for my kids, here are some valuable lessons I have learnt.

Get them involved
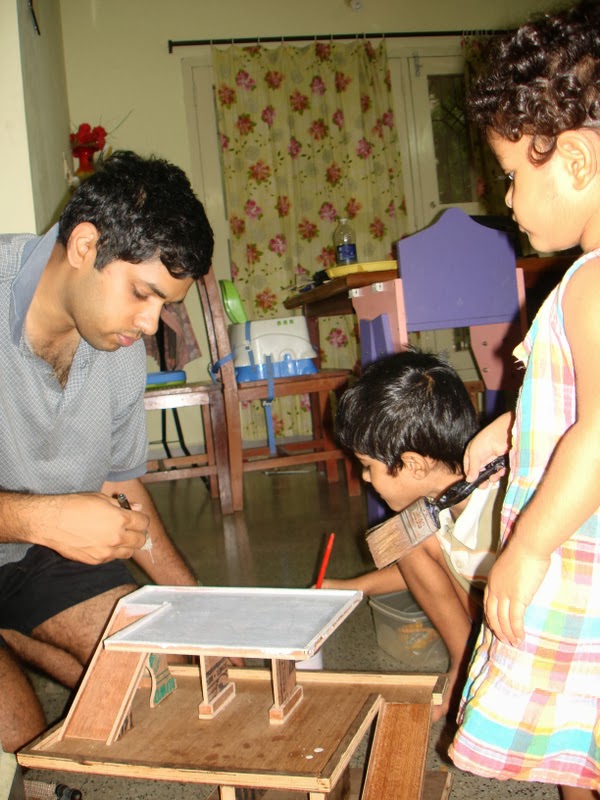
When a kid is involved in making his or her own toy, it really makes them proud. Small things like applying glue, sanding, inserting a nut and bolt, or painting their own toys can get them involved so that they can also say " I also helped". Children can also help in design. The toys will look crazy, but the kids will love it.

Make it fast and now
Very often I have postponed making things that my kids asked for as I was looking to make things perfectly. I wanted the best design etc etc which finally made me think the toy was too difficult. Sometimes I have made things slowly and steadily at my own pace that frustrated the kids. Kids like things now and soon. A ten minute toy though crude is probably an equal source of joy to a kid as compared to a 10 hour well crafted toy.

Leave room for imagination. 
I made guns for my son. He liked them. However he was equally happy picking up a waste piece of wood with a funny shape and pretending it was a fancier gun. While the hobbyist in me would like to make a scale model, with great detail, for a kid that may not matter. Leaving room for imagination is a win-win situation for both. Toys are easier to make and are delivered quicker.

Repair fast
A cracked tea cup, a broken wheel, a loose screw... Somehow it is easier to make things than to repair things. Repair is boring, but has to be done. The faster the better. I have a lot of toys and books awaiting repair, and I think it would be great for kid to know that even if it is broken, dad can repair it. I like the slogan of "quickfix" : Repairs everything except broken hearts.

One at a time 
If you give a child two toys, the chances are he will like one more. This also means he will like one less, and you ave automatically decreased the worth of one toy, just by clubbing it with a one he likes better. This happens with books, cds etc, children choose their favorites. So once again if one spaces out the toys one makes, a child can enjoy each toy individually.

Incrementally change old toys
When children grow tired of an old toy, you can increase interest in them buy adding additional features. An extra room on a garage, a new engine for a train, a new station, a level crossing, a new animal to a farm, a new gun on a tank, a new button on a gun etc can interest them again. Rather than build a complicated set at once, adding to a set over time can increase the fun a child gets out of a toy.

Let toys be misused. 
If you build a tank, with moving tracks and a turret, be prepared for it to be used as a plane, a bomb etc. Often the hobbyist in us would like the wheels we have fixed to be used as wheels. But as long as a child uses a toy and gains fun out of it, I suppose one must let boys be boys.

An interesting bit of reading is regarding a 1981 lego ad 


A motorbike made from scrap wood. Designed by my six year old son. Took about 10 minutes to build. 

A tank made with scrap wood, and left over trundle wheels. Desinged by me. It took about 10 minutes to make. Crude but leaves room for imagination


Sunday, January 12, 2014

Wooden pen stand

Wooden pen stand made from finger jointed rubber wood. Lettering with teak veneer.

Wooden pen stand made from finger jointed rubber wood


Wood : Finger jointed rubber wood 12mm for the main structure. One side teak wood veneer for the lettering.

Making the pen stand: The pieces were cut out using my home made table saw and glued together using fevicol. The edges were rounded with a round over bit using my home made router table

The lettering was cut out of one side teak veneer using a proxxon scroll saw

Finish : Normal varnish wiped away immediately.