Sunday, November 24, 2013

Carting wood

One of the problems I have is transporting wood. Of late i have been using my SUV to cart wood.
To do so I fold the back seats down and lean the front seat backwords. I remove the headrests. I place a thick sheet so that the wood does not scratch the upholstery. If there is a danger of the wood scratching any other area I protect that area too.
Transporting wood in the back of a jeep 
It gives me the versatility of getting lumber whenever I want to without the hassle of organizing a truck. The lumber yard is close to home, and I would not try this over a long distance. The SUV is none the worse after these trips.

Wooden toy pistol

Raw materials: finger jointed rubber wood 18mm thickness and Vengai wood (thinned down to 18 mm also )


The model: is based on some American pistol found on the web, but is more a mash of the designs I could easily make with the tools available. 

The barrel: Made of finger jointed wood. I used a round over bit on one side and a circular bit on the other to make grooves using a router. I drilled a hole at one end of the barrel. Using a slanting router bit I slanted the edges. The barrel was attached to the handle using two screws from above. A plug of vengai wood covered the screws. 

The handle: This was made from vengai wood, a darker wood for the contrast. Two plugs of lighter wood were inlaid for a design. 

The trigger: Made with rubber wood, with a vengai plug inlay. 
Finish: Clear varnish, wiped off immediately to give a thin matte finish. 


 Final impressions: The kids loved it. It was relatively easy to make.

Friday, October 11, 2013

Doll's House Furniture

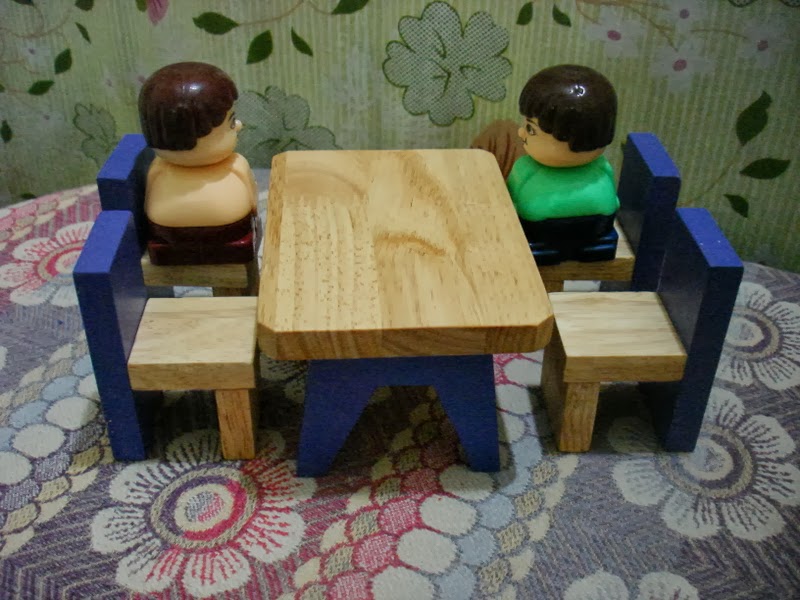
This was a set of furniture for a child who had a doll's house made by plan toys. The pieces are made of 12 mm thick finger jointed rubber wood. The yellow is stained. The rest are acrylic paints. It took a long time to dry though.
Scaling: 1:12
I used a few headless nails per piece so that it could withstand a child's handling. Even though the headless nails were very thin, I used a dremel to drill a guide guide hole first.

The bedroom set with a bed, dressing table and a stool

The dining table with four chairs

The dining table with four chairs

The dining table with block figures. 

Dressing table with stool 

The furniture all lid out and being tried out by various dolls and figurines

Sofa set with a coffee table. The yellow is stained. 

Action figures and block men try out the furniture before it is packed up

Wooden Pen Stand

This is a pen stand that I made from finger jointed rubber wood.
Pen stand made from finger jointed rubber wood

To make it I stuck four identical pieces of 12 mm finger jointed rubber wood to make the sides. Once they had partially dried I stuck it to another piece of wood for the bottom. I trimmed the pieces using my home made table saw. However I over trimmed the pieces and made a deep cut into the wood. I therefore trimmed it on all sides both on the top and at the bottom to leave a raised area in the middle.

A name was cut out from thin teak veneer and stuck on one side to personalize the gift.

The top and the bottom was routed with a round over bit to round the edges.

Finally a finish of varnish quickly wiped away deepened the color and gave it a matte finish..

Wednesday, May 29, 2013

Wooden marble run

This is a marble run made for as a gift. The inspiration was from a part of Mathias Wandel's marble machine 1. Mine resembles a small part of his.

Wood : Finger jointed rubber, 18mm for the base of the slide and 12 mm for the sides.

Individual slide : As I did no have the right router bit, I used thin strips of 12 mm finger jointed wood. The sides were rounded off using my router. The marbles tended to overshoot the ends  and hence a block to stop it from falling over.

Gluing up the individual slides of the marble run.
The individual slides in different stages of assembly.

 base : Made from 18mm finger joinged wood. This was rounded off on the upper surface.

When the run was in action, the marbles kept running all over the floor and one had to fish them out from under the bed and tables. Thus I added a small fence like thing on the base to keep the marbles in place.

Vertical Pillars : made from 18 mm finger jointed wood. Each slide was screwed on  using two screws on each side. The screws looked a bit unsightly, so I added a thin piece of wood on the pillars to hide the screws. This was pasted on. From the inner surface of the pillars,  two screws attached it to a broad foot. This was screwed on from the under side of the base.

The finished product : I took a video of it in action, however there is a lot of noise from the ceiling fan. I need to work on my shooting skills.


Finished marble run made of finger jointed rubber. 


Drying wood indoors


I had bought a lot of wood for building a bunk bed. One of the problems I faced was that the wood was really wet, even wet to the touch. It was straight out of the tree. With temperatures reaching 45 degrees centigrade in Vellore, drying the wood outside, though tempting resulted in cracks. So this wood was dried indoors, before planing. This is karuvelum wood or the Indian Babul. I stacked up the wood indoors and put on the fan. It dried a lot over a week. The pile of wood on the left is the wood stacked for drying. The previous lot of wood, already dried is seen piled up on the right.

This is by no means the correct way to dry wood. Wood is supposed to dry slowly, over a period of months to a year, with the humidity controlled. But this was my only option. 

Karuvelum (Babul) wood stacked indoors for drying. To the right is seen wood already dried, piled up close together.

Wednesday, May 15, 2013

Cracks in wood

 One of the problems that I have been facing is the many cracks that develop in wood as it dries. I have been planning to use karuvelam wood (babul) for making a bunk bed. Drying it outside caused cracks at the end. From what I have read this seems to be due to drying too fast. (Vellore now has temperatures above 40 degrees Centigrade). I plan to dry it indoors so that the process is a little slower and see if this helps.
Cracks in wood
Cracks that developed in Babul wood on drying rapidly (karuvelam wood)

(This is my first post using windows live writer)

Monday, April 15, 2013

MDF toy box

With two kids at home, there are always toys strewn around. We wanted some way to rapidly store them. There are commercially available stacking boxes that are very convenient, but then as I always claim to be able to make the same, I decided to go ahead and do so.
This was my first foray with MDF.

The first impressions : MDF is really heavy. It is heavier than plywood of the same thickness. It is dense, and tends to chip at the edges if you bump it around. But it is straight and smooth.

Wooden toy storage box made from MDF and varnished over.

Wooden toy box : The unending joy that a box can provide to a child...


Wood : 10 mm  MDF, with varnish over it,

Dimensions : About 2.5 ft x 1 ft x 1 ft.

Hinges : Fixed them initially, but as I could not get safety hinges, and the kids seemed to enjoy slamming it shut, I finally removed the hinges and made the top removable.

Wheels : I had also attached small castor wheels underneath. However this was very tempting for the kids and they started pushing it here and there and bumping their feet. So off went the wheels and instead I used nylon bushes. As he floor is very smooth, it slides easily.

Final impressions : Stores a lot of toys. However it is very heavy, and the kids cannot easily open and close it. It therefore stores all the toys that they are not really using. It can be pushed under the sofa as well as as a small step for my daughter to reach the sink.

If I were to do it again, I would use 'commercial ply' and paint it over. It was just much easier to work with, and I think would be lighter. I would also make the whole box smaller. I still have to fix handles for the box, but have not got down to doing so as yet.


Sunday, April 14, 2013

Skil 0909 Portable Worbench

With a space crunch I decided to go ahead and purchase a skil workbench. This was available from Mach power tools

Service : Excellent service from Mach power tools as has been my experience.

Packaging : Very slim parcel, nicely packed

Skil 0909 workbench was available in India from Mach Power Tools. Slim packaging 

I first dumped out all the components. Needless to say my kids were very excited with the process. Assembly was fairly simple using the provided literature.

Skil 0909 workbench with individual components

The table top waas assembled first, and the supports later.

Skil 0909 workbench assembled table top
The kids had a whale of a time playing with the table.

Assembled skil 0909 workbench.Note the holes in the lower cross bars for holding tools

Final Impressions. This table is a light duty table. It is useful for light work. I use it routinely now to clamp my proxxon DS 230E scroll saw, that obviates the need to screw it down on to the table. The table cannot be completely folded which is kind of a design flaw, but is sturdy enough for light work.  The holes for the tool holders on the lower cross bars are very useful for hanging up tools that one often uses. There are many holes on the table top for the bench dogs. The bench dogs help hold pieces of varied shapes. For Rs 2500/-  I think that the table is really worth it. A pair of these will be more useful than one.

Skil 0909 workbench being used to clam the proxxon DS 230/E scroll saw


Small wooden wall shelf

I had some pieces of finger jointed rubber that I wanted to use as a shelf.  Here is how it went. Dimensions were based on the pieces I had

Wood : Finger jointed wood, 18mm for the base and the cross bar, 12 mm for the sides.

Finish : Sheenlac walnut stain, with an asian paints varnish wiped over it.

The finished product : This was the first time I experimented with dowels for anchoring the sides. This seemed very solid, however I think the quality of my dowels was not very good. I must try making my own dowels.

Secondly a bit of fevicol peeping out of the joint took up stain deeply and appeared as blotches. I have to be a little more careful next time.

Book Shelf : Unstained finger jointed wood. Sides joined with dowels
Empty book shelf stained with Sheenlac walnut stain to match the picture above.  Fixed to the wall with two screws

Wooden book shelf bearing a full weight of books.