Friday, December 27, 2013

Wooden peg dolls

This is set of wooden peg dolls

Wooden peg dolls made from babul, pine and rubber wood

The heads were bought from a local craft shop. They are wooden beads. They had a hole on both sides. I filled up both with a wooden plug and used one side to attach them to the body.

The dark wood is karuvelum (babul). The lighter wood is finger jointed rubber and an old piece of pallet wood, probably pine.

The heads and body are joined together with wooden plugs cut with a plug cutter.

Wooden peg dolls. The heads are beads. The hole on top is filled with a plug
To shape the body I used an Einhell belt sander. The entire process would have been much easier with a soft wood and with a lathe, but as I do not have a lathe at present, a sander was the only option.

I used a router to eat away a little of the outer portion to make the legs.

Wooden peg dolls : The basic shapes made with a belt sander

Thursday, December 19, 2013

Dolls house furniture 2

This was another set of doll's house furniture made as a gift. This is 1:6 in scaling, and is made to fit Barbie dolls.
A doll's house sofa set made from Finger jointed rubber wood

My daughter's barbie dolls with a bit of decoration on the sofa set 

Wood: Finger jointed rubber wood. A small piece of babul wood for the table legs
Stain: Walnut stain for the sides to provide some constrast.
Finish: Glossy wood varnish, wiped away to give a thin matte coat.
Making the pieces: The pieces were first cut out with my home made table saw. The edges were routed using a router table. They were stuck together and fixed with headless nails. A pilot hole was drilled with a Dremel 300 to avoid the wood splitting when hammering in.
Over all effect : I was happy with the way the pieces turned out. The stain on the sides could have been darker.

Friday, December 13, 2013

Toggle clamps

Here are a set of toggle clamps that I bought from Abbot Toolfast Pvt Ltd.
My experience with them was very good. I was able to purchase two clamps online.
I have used them on my home made table saw cross cut jig which has helped me now cut much thinner and smaller pieces of wood.
The cost was about Rs 650 per clamp (including shipping and taxes). They have a lot of other clamps that one could purchase. The white ends of the clamps are actually nylon bushes that I fixed at the lower end of the clamp.


Sunday, November 24, 2013

Carting wood

One of the problems I have is transporting wood. Of late i have been using my SUV to cart wood.
To do so I fold the back seats down and lean the front seat backwords. I remove the headrests. I place a thick sheet so that the wood does not scratch the upholstery. If there is a danger of the wood scratching any other area I protect that area too.
Transporting wood in the back of a jeep 
It gives me the versatility of getting lumber whenever I want to without the hassle of organizing a truck. The lumber yard is close to home, and I would not try this over a long distance. The SUV is none the worse after these trips.

Wooden toy pistol

Raw materials: finger jointed rubber wood 18mm thickness and Vengai wood (thinned down to 18 mm also )


The model: is based on some American pistol found on the web, but is more a mash of the designs I could easily make with the tools available. 

The barrel: Made of finger jointed wood. I used a round over bit on one side and a circular bit on the other to make grooves using a router. I drilled a hole at one end of the barrel. Using a slanting router bit I slanted the edges. The barrel was attached to the handle using two screws from above. A plug of vengai wood covered the screws. 

The handle: This was made from vengai wood, a darker wood for the contrast. Two plugs of lighter wood were inlaid for a design. 

The trigger: Made with rubber wood, with a vengai plug inlay. 
Finish: Clear varnish, wiped off immediately to give a thin matte finish. 


 Final impressions: The kids loved it. It was relatively easy to make.

Friday, October 11, 2013

Doll's House Furniture

This was a set of furniture for a child who had a doll's house made by plan toys. The pieces are made of 12 mm thick finger jointed rubber wood. The yellow is stained. The rest are acrylic paints. It took a long time to dry though.
Scaling: 1:12
I used a few headless nails per piece so that it could withstand a child's handling. Even though the headless nails were very thin, I used a dremel to drill a guide guide hole first.

The bedroom set with a bed, dressing table and a stool

The dining table with four chairs

The dining table with four chairs

The dining table with block figures. 

Dressing table with stool 

The furniture all lid out and being tried out by various dolls and figurines

Sofa set with a coffee table. The yellow is stained. 

Action figures and block men try out the furniture before it is packed up

Wooden Pen Stand

This is a pen stand that I made from finger jointed rubber wood.
Pen stand made from finger jointed rubber wood

To make it I stuck four identical pieces of 12 mm finger jointed rubber wood to make the sides. Once they had partially dried I stuck it to another piece of wood for the bottom. I trimmed the pieces using my home made table saw. However I over trimmed the pieces and made a deep cut into the wood. I therefore trimmed it on all sides both on the top and at the bottom to leave a raised area in the middle.

A name was cut out from thin teak veneer and stuck on one side to personalize the gift.

The top and the bottom was routed with a round over bit to round the edges.

Finally a finish of varnish quickly wiped away deepened the color and gave it a matte finish..

Wednesday, May 29, 2013

Wooden marble run

This is a marble run made for as a gift. The inspiration was from a part of Mathias Wandel's marble machine 1. Mine resembles a small part of his.

Wood : Finger jointed rubber, 18mm for the base of the slide and 12 mm for the sides.

Individual slide : As I did no have the right router bit, I used thin strips of 12 mm finger jointed wood. The sides were rounded off using my router. The marbles tended to overshoot the ends  and hence a block to stop it from falling over.

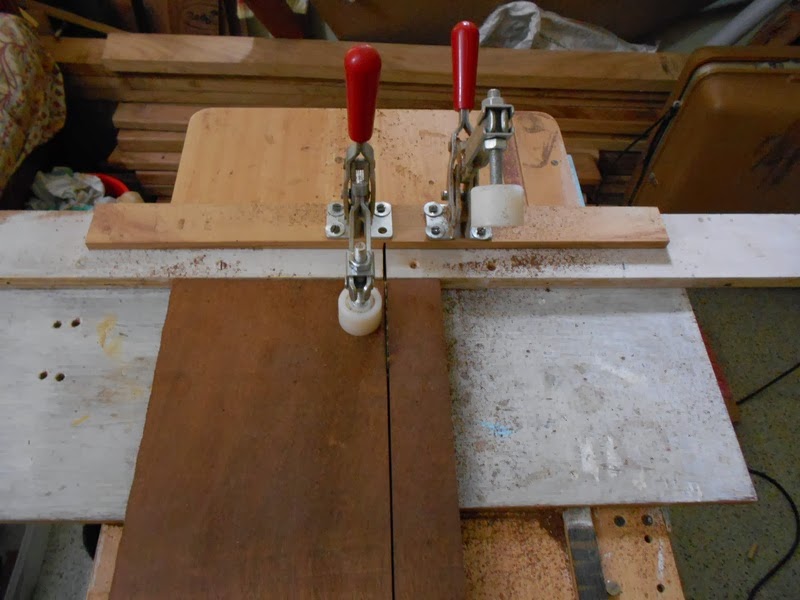
Gluing up the individual slides of the marble run.
The individual slides in different stages of assembly.

 base : Made from 18mm finger joinged wood. This was rounded off on the upper surface.

When the run was in action, the marbles kept running all over the floor and one had to fish them out from under the bed and tables. Thus I added a small fence like thing on the base to keep the marbles in place.

Vertical Pillars : made from 18 mm finger jointed wood. Each slide was screwed on  using two screws on each side. The screws looked a bit unsightly, so I added a thin piece of wood on the pillars to hide the screws. This was pasted on. From the inner surface of the pillars,  two screws attached it to a broad foot. This was screwed on from the under side of the base.

The finished product : I took a video of it in action, however there is a lot of noise from the ceiling fan. I need to work on my shooting skills.


Finished marble run made of finger jointed rubber. 


Drying wood indoors


I had bought a lot of wood for building a bunk bed. One of the problems I faced was that the wood was really wet, even wet to the touch. It was straight out of the tree. With temperatures reaching 45 degrees centigrade in Vellore, drying the wood outside, though tempting resulted in cracks. So this wood was dried indoors, before planing. This is karuvelum wood or the Indian Babul. I stacked up the wood indoors and put on the fan. It dried a lot over a week. The pile of wood on the left is the wood stacked for drying. The previous lot of wood, already dried is seen piled up on the right.

This is by no means the correct way to dry wood. Wood is supposed to dry slowly, over a period of months to a year, with the humidity controlled. But this was my only option. 

Karuvelum (Babul) wood stacked indoors for drying. To the right is seen wood already dried, piled up close together.

Wednesday, May 15, 2013

Cracks in wood

 One of the problems that I have been facing is the many cracks that develop in wood as it dries. I have been planning to use karuvelam wood (babul) for making a bunk bed. Drying it outside caused cracks at the end. From what I have read this seems to be due to drying too fast. (Vellore now has temperatures above 40 degrees Centigrade). I plan to dry it indoors so that the process is a little slower and see if this helps.
Cracks in wood
Cracks that developed in Babul wood on drying rapidly (karuvelam wood)

(This is my first post using windows live writer)